Resend my activation email : Register : Log in 
BCF: Bike Chat Forums


My NSR restoration Project!

Reply to topic
Bike Chat Forums Index -> Show & Tell
View previous topic : View next topic  
Author Message

Thom
World Chat Champion


Joined: 24 Oct 2007
Karma :

PostPosted: 08:16 - 18 Feb 2008    Post subject: My NSR restoration Project! Reply with quote

Due to having bought a honda nsr 125 (1990) that had been rebuilt somewhat poorly by the previous owner i've decided, due to the fact it wont sell, to rebuild it and restore it to it's former glory.

There are a few things i need to sort out before the bikes rideable again though:

1) The choke cable needs replacing
2) [strike]The throttle cable needs replacing[/strike] 1990 throttle cable on order but it's a 99 bike, unsure of fit!
3) The brakes could do with a bit of an overhaul
4) Possibly braided brake lines
5) New generator cover
6) New lock set (My seat and steering lock are damaged/dont have a key)
7) [strike] Replace the fork seals[/strike] Not required anymore
8) Sort out the extreme smoke problem the bike has when it revs past 5k while cold (I know it's a 2 stroke but i'll get a video to show you just how bad it is!)
9) Re-adjust the oil pump and idle speeds after new cables installed
10) Soak the air filter
11) Try and figure out why the bikes idle can be fine one day but really off the next
12) Clean the exhaust out (Maybe buy a end can too)
13) Buy new windscreen
14) Find nut to fit an engine bolt
15) Locate 2 rubber lugs that attatch to the NSR's frame as fairing mounts
16) Find a whole new set of fairings or have mine welded
17) Fit new Renthal cog's and chain, +2 teeth on rear
18) Increase air intake
19) Remove carb restriction (If it's still in place)
20) Upjet carb

I think thats about the lot!

Can i just ask, I need the fairings repairing, this includes several small cracks, a deep 'cut' and about 10 different mounting points fixing, is this possible?

Is it even viable if i had a budget of say £300-£400?

If anyone can give any advice on any of the above points please do!

Pictures will follow later today, as well as a video of my extremely smokey engine later in the week!
 Back to top
View user's profile Send private message Send e-mail You must be logged in to rate posts

Thom
World Chat Champion


Joined: 24 Oct 2007
Karma :

PostPosted: 17:56 - 22 Feb 2008    Post subject: Reply with quote

Well here we go!

Sorry I haven't got photo's yet, I swear I will tomorrow!

Well, The throttle cable came, infact two of them did...

So i chose one at random and tried for a fit, I was devestated when after removing numerous parts There was too much slack on the oil pump cable when i was adjusting it...

Silly me!

After spending an hour of tweeking to shorten the slack i realised, to adjust an oil pump the throttles meant to be fully open, not fully closed Embarassed

So it's true, a 1990 spec throttle cable fits a 1999 engine, well chuffed!
 Back to top
View user's profile Send private message Send e-mail You must be logged in to rate posts

Thom
World Chat Champion


Joined: 24 Oct 2007
Karma :

PostPosted: 19:24 - 29 Feb 2008    Post subject: Reply with quote

1) The choke cable needs replacing

2) Re-adjust the oil pump and idle speeds after new cables installed

3) Try and figure out why the bikes idle can be fine one day but really off the next

4) Clean the exhaust out

5) Buy exhaust putty

6) Buy new windscreen

7) Find nut to fit an engine bolt

8) Plastex fairing mounts/lugs

9) Fill up motor oil and coolant

10) Sand/strip all paint off

11) Fill and uneven spots

12) Paint fairings (3 coats primer, 3 coats black and 3 coats clear)

13) Buy and install clutch and generator gaskets

Well some progress has been made!

I've started on the fairings this week, trying to strip the paint off with a sander is no easy task at all... infact in a week i've only barely done one main panel.

but on the positive side i invested in some plastex and after a little confusion of how to use the stuff i've found a fool proof way and it's amazing!

Ok so a standard kit wasnt enough, and only fixed about 5-6 mounts/faults but for the price you cant go wrong!

I had the clutch casing off today to see if i could find anywhere oil might be getting into the combustion chamber and causing the bike to smoke so much, i think it must just be running a bit rich still because theres nothing leaking nor did the oil level ever change.

Anywhos!

I need a few bits and pieces but the bikes coming together nicely now, I still havent got any pictures of the bike itself but i think i'll go take some of my fairings.

Be right back =]
 Back to top
View user's profile Send private message Send e-mail You must be logged in to rate posts

Thom
World Chat Champion


Joined: 24 Oct 2007
Karma :

PostPosted: 19:55 - 29 Feb 2008    Post subject: Reply with quote

Heres a few photo's just to give an idea of what im doing!

Tank/LHS top fairing damage/gap and LHS/Lower LHS fairing damage, notice the bolt holes missing on the lower fairing)
https://i134.photobucket.com/albums/q119/mfereborn/BILD2530.jpg

RHS lower fairing gap, again bolt holes missing
https://i134.photobucket.com/albums/q119/mfereborn/BILD2528.jpg

RHS gaps, again, i suspect these gaps are because of missing mounts/bolts
https://i134.photobucket.com/albums/q119/mfereborn/BILD2527.jpg

RHS again
https://i134.photobucket.com/albums/q119/mfereborn/BILD2525.jpg

Rear fairings joined by cable tie
https://i134.photobucket.com/albums/q119/mfereborn/BILD2523.jpg

Tank filler panel gap (suspect the cause is two bodged mounts which arn't visable)
https://i134.photobucket.com/albums/q119/mfereborn/BILD2521.jpg

Before paint prep
https://i134.photobucket.com/albums/q119/mfereborn/Fishinggear004.jpg
https://i134.photobucket.com/albums/q119/mfereborn/Fishinggear005.jpg

Paint prep begins! (sanding, i need a new method of removing paint from plastic!)
https://i134.photobucket.com/albums/q119/mfereborn/Fishinggear003.jpg
https://i134.photobucket.com/albums/q119/mfereborn/Fishinggear002.jpg
https://i134.photobucket.com/albums/q119/mfereborn/Fishinggear001.jpg

Needs filling!
https://i134.photobucket.com/albums/q119/mfereborn/Fishinggear029.jpg

Rubber lug replaced
https://i134.photobucket.com/albums/q119/mfereborn/Fishinggear009.jpg

Plastex!
Snapped in half, idiot light panel
https://i134.photobucket.com/albums/q119/mfereborn/Fishinggear023.jpg
https://i134.photobucket.com/albums/q119/mfereborn/Fishinggear027.jpg

Idiot light panel plastex tab
https://i134.photobucket.com/albums/q119/mfereborn/Fishinggear021.jpg

Idiot light panel repalced mounts/lugs
https://i134.photobucket.com/albums/q119/mfereborn/Fishinggear013.jpg

Got myself a wee project for sure!
 Back to top
View user's profile Send private message Send e-mail You must be logged in to rate posts

benjami
Nearly there...


Joined: 14 Nov 2007
Karma :

PostPosted: 17:51 - 02 Mar 2008    Post subject: Reply with quote

Looks like we have a few of the same problems..
Did your stickers just sand off eventually? or did you use a heat gun, for me it seems 16 year old stickers do not want to come off entirely.

Good luck!
 Back to top
View user's profile Send private message Send e-mail You must be logged in to rate posts

st3v3
Super Spammer


Joined: 16 Oct 2006
Karma :

PostPosted: 20:10 - 02 Mar 2008    Post subject: Reply with quote

Looks like the issue with your fairings is some artful bodger like me has owned it in the past. Laughing

Looks interesting.
 Back to top
View user's profile Send private message You must be logged in to rate posts

Thom
World Chat Champion


Joined: 24 Oct 2007
Karma :

PostPosted: 20:21 - 02 Mar 2008    Post subject: Reply with quote

Benjami,
these arnt the original stickers and sanding them just clogs up the emery tape (yes sand papaer just doesnt work!) with melted plastic deposits.

A hair drier and blunt scraper are what i use for the stickers, if that fails soak the panels in a bath of water over night (Y)

St3v3,
Alot of the fairings had been mounted with peices of metal strips drilled with holes, the tank panel which you can see a large gap around has no mounts left and was held in place by two small strips of brass of all things!

Pieces of drilled steel were found all over the bike as well. I need to buy yet more plastex!
 Back to top
View user's profile Send private message Send e-mail You must be logged in to rate posts

Thom
World Chat Champion


Joined: 24 Oct 2007
Karma :

PostPosted: 12:57 - 06 Mar 2008    Post subject: Reply with quote

Well in goes the new choke cable and how nice is it to have one without damage, I bought it from a broken JC20 for just a fiver and it's in mint condition.

Well chuffed!

I just need to try and clean the engine out, i think theres oil sitting in there...

We'll see!
 Back to top
View user's profile Send private message Send e-mail You must be logged in to rate posts

MetalheadA7X
Two Stroke Sniffer


Joined: 24 Mar 2008
Karma :

PostPosted: 01:59 - 25 Mar 2008    Post subject: Reply with quote

Thom has a nice bike to work on, i can't wait to see the finished article!

See you in college on Wednesday!
 Back to top
View user's profile Send private message Visit poster's website You must be logged in to rate posts

Thom
World Chat Champion


Joined: 24 Oct 2007
Karma :

PostPosted: 08:49 - 25 Mar 2008    Post subject: Reply with quote

ah nice to see you join us chris!

More photo's are to come today, not much to physically show but i might have a nice surprise in the form of a video... askign for help!

but it's almost done, minus windscreen and paint =]
 Back to top
View user's profile Send private message Send e-mail You must be logged in to rate posts

Thom
World Chat Champion


Joined: 24 Oct 2007
Karma :

PostPosted: 10:32 - 25 Mar 2008    Post subject: Reply with quote

What a day, I went and sat in my cold 'improvised workshop' (Shed) and got to work getting the bike to run properly.

Yesterday i drained the oil and coolant off again to sort out my drain bolt, my oil now drains properly. So after measuring out 700ml of 10 - 40w and topping up the coolant until i could force no more bubbles out of the system i got it outside and started her up... She was being a bitch!

It just wouldnt run properly and if i threw on any revs it would bog down as if it was flooding and then stall.

I had more than enough yesterday and so i went back to it today.

I slackened off the throttle cable all the way, made the oil pump run slightly richer than it was and turned the idle screw most of the way in.

Brilliant!

It fired up first time without a problem.

Now im nto sure how a bike should run when cold, because mine has always been a bast*rd anyway, but it seemed really good. It won't idle at the moment, and im not sure why but the revs went up and down nice and smooth with only a little bit of bogging when i was a little hasty with the throttle.

The bikes now really loud compared to how it was, but i suppose after cleaning all the carbon out of the exhuast the damping effect is lost.

Well i think i only have one more job on the mechanical side of things and that is to make the bike idle properly, infact idle at all, anything under 1400rpm it bogs down and stalls so i need to figure out why, turning the idle screw doesnt seem to work for it...

But we're getting there!

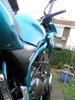
Now i will concentrate on the fairings, repairs are under way, some filling has begun and plastex has been added.

But there isnt much plastex in the standard kit and i had alot of mounts broken, oh well... i'll get some araldite and improvise!

I've got one or two pictures, only a couple but it shows the bike in its current state... and a state it is Very Happy

1) The choke cable needs replacing Done

2) Re-adjust the oil pump and idle speeds after new cables installed Work in progress!

3) Try and figure out why the bikes idle can be fine one day but really off the next I can't make it idle without throttle right now

4) Clean the exhaust out Done, and what a great difference it makes!

6) Buy new windscreen

8) Plastex fairing mounts/lugs A couple done but it's expensive for what you get! Investing in araldite instead

9) Fill up motor oil and coolant Done

10) Sand/strip all paint off Half done, hard bloody work!

11) Fill any uneven spots Started

12) Paint fairings (3 coats primer, 3 coats black and 3 coats clear)

13) Buy and install clutch and generator gaskets Done![/b]

https://i134.photobucket.com/albums/q119/mfereborn/BILD2658.jpg
https://i134.photobucket.com/albums/q119/mfereborn/BILD2657.jpg
https://i134.photobucket.com/albums/q119/mfereborn/BILD2656.jpg
https://i134.photobucket.com/albums/q119/mfereborn/BILD2655.jpg
 Back to top
View user's profile Send private message Send e-mail You must be logged in to rate posts
Old Thread Alert!

The last post was made 17 years, 283 days ago. Instead of replying here, would creating a new thread be more useful?
  Display posts from previous:   
This page may contain affiliate links, which means we may earn a small commission if a visitor clicks through and makes a purchase. By clicking on an affiliate link, you accept that third-party cookies will be set.

Post new topic   Reply to topic    Bike Chat Forums Index -> Show & Tell All times are GMT
Page 1 of 1

 
You cannot post new topics in this forum
You cannot reply to topics in this forum
You cannot edit your posts in this forum
You cannot delete your posts in this forum
You cannot vote in polls in this forum
You cannot attach files in this forum
You cannot download files in this forum

Read the Terms of Use! - Powered by phpBB © phpBB Group
 

Debug Mode: ON - Server: birks (www) - Page Generation Time: 0.16 Sec - Server Load: 0.49 - MySQL Queries: 13 - Page Size: 78.89 Kb