|
|
| Author |
Message |
| Resident Yank |
This post is not being displayed .
|

Resident Yank
Renault 5 Driver

Joined: 17 May 2007
Karma : ")
|
 Posted: 15:56 - 03 Nov 2009 Posted: 15:56 - 03 Nov 2009 ") Post subject: SV650 track/race bike build. Post subject: SV650 track/race bike build. |
 |
|
Hi all, I've actually been wanting to make this post for a while just to chronical the build of this bike, however I haven't gotten around to it. So now I finally am.
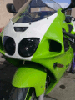
A few months ago a friend of mine wouldn't shut up about how he wanted to build an SV650 for the track and to race next year, however he never did anything about it. So I started looking on local classified ads and low and behold up popped an ad for a crashed '01 SV650 for $1,000 (that's cheap here in the US). My friend, Richard, was out of town so I called him and told him about the ad, he said to go look at it, so I did and it was a complete basketcase of a bike. I called Richard and he said if it ran offer 900 and if not offer 700. It didn't ran and they ended up taking the 700 and I loaded up the "bike" and brought it home.
Here she be in all her glory:
https://i10.photobucket.com/albums/a144/Tiffanator/Phoenix/IMG_0381.jpg
https://i10.photobucket.com/albums/a144/Tiffanator/Phoenix/IMG_0383.jpg
I can't even begin to list everything that was wrong with the bike, and each time I looked, I found more wrong. The main problem was that the key that was stuck in the ignition was for a GM car... didn't find that out until I was home. So I backed the bike off the trailer, grabbed a pair of pliers and popped it into first. Big push... sliding rear wheel. Bad. Yanked both spark plugs out, both rusty, bad. Another big push, sliding rear wheel. Great... I just bought a bike with a supposedly NEW engine in it that is siezed. Awesome. Richard is going to kill me. Back into neutral and I tuck it away in the garage awaiting tear down day.
Tear down... day 1. Engine removal.
Don't have pics of the entire process, which is good for you guys cause its boring. Basically after the first day the bike looked like this.
https://i10.photobucket.com/albums/a144/Tiffanator/Phoenix/_MG_6333.jpg
As we lowered the engine, water ran out of the front cylinder, never a good sign. Richard took the engine back to his house to rebuild it and sent me this pic...
https://i10.photobucket.com/albums/a144/Tiffanator/Phoenix/sv2.jpg
Well THERE'S your problem Not a siezed engine in the common sense of the term. The front piston was rusted to the cylinder walls. That basically confirmed a rebore was in order. He was lucky enough to have a friend with bits of an SV motor and scored a free head along with other parts. He sent everything off to Zlock racing to be bored out 3mm to 680cc and ordered a Wiseco 12.5:1 compression ratio piston set.
Oooo... pretty.
https://i10.photobucket.com/albums/a144/Tiffanator/Phoenix/sv4.jpg
https://i10.photobucket.com/albums/a144/Tiffanator/Phoenix/sv5.jpg
https://i10.photobucket.com/albums/a144/Tiffanator/Phoenix/sv7.jpg
Much better! Thankfully, the rest of the engine looked brand new. Maybe the guy wasn't lying about having a new engine, he just took the tank off and let it rain through the airbox and front carb and into the front cylinder. Moronic redneck! Anyway, along with the rebore we purchased a set of '03+ intake cams and put them in, then took the '01 intake cams and replaced the exhaust cams with them. Or I think that's how it went, that was a while back. Reset the timing and buttoned the engine back up.
I'll be back in a little bit with another part of the story, basically what I was doing while Richard tinkered with the engine.
____________________
Snooping in from the US, don't kill me. |
|
| Back to top |
  |
You must be logged in to rate posts |
|
 |
| Resident Yank |
This post is not being displayed .
|
Resident Yank
Renault 5 Driver
Joined: 17 May 2007
Karma :
|
Posted: 16:28 - 03 Nov 2009 ") Post subject: Post subject: |
|
|
Part 2. What I did while Richard rebuilt the engine.
So backstepping a little bit, he took the engine after day 1 and left me with a rotting SV carcass to clean up and make beautiful again. This project became known as "Phoenix" because it was going to rise from the ashes (and rusty road goo) that was its former body.
So, on day 2 of tear down I set out to strip the bike to its individual components. I removed the carburetors, wiring harness, fairing stay, ignition coils and on and on. Packing each part nicely into a bag with its bolts and nuts and labeling it, then throwing the bag into the "box-o-bike" that was filling up in the corner of the garage.
Few pics from day 2. Mostly took these as reference for when we put it all back together.
https://i10.photobucket.com/albums/a144/Tiffanator/Phoenix/_MG_6354b.jpg
https://i10.photobucket.com/albums/a144/Tiffanator/Phoenix/_MG_6337.jpg
Nearing the end of day 2 and facing some pretty disgusting stuff. This was apparently never cleaned.
https://i10.photobucket.com/albums/a144/Tiffanator/Phoenix/_MG_6378.jpg
I was not looking forward to having to clean and paint all of that. Anyway, I then hit a problem, it seems there is a special swingarm locking nut removal tool that I didn't have. The stealer... I mean... dealer wanted upwards of 60 bucks for said tool. I called Richard for ideas and we came up with a way to make our own. I give you... the redneck special!
https://i10.photobucket.com/albums/a144/Tiffanator/Phoenix/_MG_6384.jpg
We bought a short length of pipe and I used my grinder to carve out 4 notches to fit in the grooves. Welded the pipe onto a big nasty looking screwdriver and done. After a few tries we break off one of the notches. So out comes the welder again. I build up a nice bead of metal then grind it back down to shape. Worked a treat. Soon the frame and swingarm parted ways and I set to cleaning and sanding.
In the 3 or 4 (or 10) day process of cleaning and prepping the frame for paint I was also sourcing parts. Since this SV got a beefy motor, she was also going to get a beefy front end. I hit ebay and found an '07 GSX-R600 complete front end and wheel. It was ordered and before long arrived at my door. Sweet! Once we had that I ordered the neck bearing required to fit the front end to our SV frame. Everything was stored neatly (or not) in my garage. It began to look like a motorcycle breakers in there.
Finally, after much sanding, grinding, sandblasting, sweating, swearing and throwing things, the frame was to the point that I could paint it.
Sanded, skewered and ready for primer:
https://i10.photobucket.com/albums/a144/Tiffanator/Phoenix/IMG_0430.jpg
First coat of epoxy primer to really make the paint stick. It actually looks quite good in white. Please forgive the crappy cell phone pics.
https://i10.photobucket.com/albums/a144/Tiffanator/Phoenix/IMG_0434.jpg
Don't have pics of the frame covered in 2 part urethane primer, but oh well, it was just gray. Then rain began to threaten and I had to think fast.
https://i10.photobucket.com/albums/a144/Tiffanator/Phoenix/IMG_0437.jpg
With simple minds come simple ideas. Worked though. Once the primer was dried it was time for top coat. I chose an idustrial flat black for durability. And... well... I don't have any pics of the finished frame all alone. Sorry about that.
The swingarm and the rear rim recieved the same treatment, sanding, swearing, throwing things, epoxy primer, 2k primer, then industrial flat black.
Then it was time to work on the subframe. It was to be flat black just like the frame, but I wanted to shave off some tabs that were of no use anymore. So out came the grinder with a thin cutting blade which made short work of the tabs.
Tab:
https://i10.photobucket.com/albums/a144/Tiffanator/Phoenix/IMG_0468.jpg
Bye bye tab:
https://i10.photobucket.com/albums/a144/Tiffanator/Phoenix/IMG_0469.jpg
Little bit of grinding to smooth it out, some body filler and you never knew it was there.
https://i10.photobucket.com/albums/a144/Tiffanator/Phoenix/IMG_0473.jpg
Up next was our big assembly day where the engine, shock, front end, subframe, frame and swingarm all came together.
____________________
Snooping in from the US, don't kill me. |
|
| Back to top |
| |
You must be logged in to rate posts |
|
|
| Wafer_Thin_Ham |
This post is not being displayed .
|
Wafer_Thin_Ham
Super Spammer

Joined: 18 Nov 2005
Karma : ") ")
|
Posted: 17:14 - 03 Nov 2009  Post subject: Post subject: |
|
|
Looking good. 
____________________
My Flickr |
|
| Back to top |
| |
You must be logged in to rate posts |
|
|
| Resident Yank |
This post is not being displayed .
|
Resident Yank
Renault 5 Driver
Joined: 17 May 2007
Karma :
|
Posted: 19:43 - 03 Nov 2009 ") Post subject: Post subject: |
|
|
Ok, so I've had my lunch and its time for part 3 of the story. I guess. So at this point the frame, swingarm, rear rim, and subframe had been painted flat black. The new GSXR front rim was already black, the engine was back together and it was time to start making all these pieces look like a motorcycle.
We started by lowering the frame over the engine, as this is a much easier way than trying to lift the engine back up. Once the engine was bolted up it was time to put the front end and swingarm on. Much to our surprise the OEM shock from Richard's '07 ZX-6R bolted right up to the SV frame and swingarm using all of the stock hardware. Sweet little upgrade there. Sorry, no pics of this process because it was all done quite quickly.
With the swingarm in place we sorted through the neck bearings and fittings and spacers and worked out what we needed to attach the GSXR front end. The neck had to be ground out some to accomodate the new bearing, which was easily handled. With the new forks bolted up we could put it on the stands and all that was left was the subframe.
https://i10.photobucket.com/albums/a144/Tiffanator/Phoenix/IMG_0487.jpg
https://i10.photobucket.com/albums/a144/Tiffanator/Phoenix/IMG_0488.jpg
It was finally beginning to look something like a motorcycle. From that point many small but important things were done like fitting the wiring harness back on, modifying the GSXR handlebar switches to connect to the SV wiring harness, making a front fairing stay, trying to get it into neutral, figuring out an exhaust. All of those fun things.
Thankfully Richard is an electrical engineer so he was able to figure out the rats nest of wires that had to be cut and reconnected to make things work. Cause to me it was just colorful spaghetti. However, thanks to the SV workshop manual failing to mention that there is a 100ohm diode in the ignition barrel that allows the computer to send a signal to allow spark... we now have an extra stator and TCI and wasted 3 weeks chasing an electrical fault that didn't actually exist.
Getting a bit out of order of things here... Somewhere before we actually got the bike to crank Richard mounted up some new rubber and installed a new radior and 520 chain and sprokets. Rearsets and bodywork were ordered and plans made to fabricate a new front fairing stay. We also figured out that the small battery we bought was not powerful enough to actually crank the bike, so the battery box Richard made would have to be modified to fit a larger battery.
Sorry for the horrible lack of photos, lots of small things were done and we just took pics of the end results.
https://i10.photobucket.com/albums/a144/Tiffanator/Phoenix/svrace1.jpg
New tires, new chain and sprockets, yes... only one front brake rotor on in this picture because one apparently was damaged when the front wheel was shipped so a new one had to be ordered.
Now that it would roll Richard took it back to his house to finish up the last few things that needed doing on the engine and electrics while I worked on the fuel tank and bodywork. A new Two Brothers exhaust was fitted to the stock pipes that were painted with high temp paint, Woodcraft rearsets installed as well.
https://i10.photobucket.com/albums/a144/Tiffanator/Phoenix/110-1090_IMG.jpg
Will make a new post about bodywork... man it was a task.
____________________
Snooping in from the US, don't kill me. |
|
| Back to top |
| |
You must be logged in to rate posts |
|
|
| brooky |
This post is not being displayed .
|
brooky
Brolly Dolly
Joined: 27 Jan 2006
Karma : ")
|
|
| Back to top |
| |
You must be logged in to rate posts |
|
|
| FreshAL |
This post is not being displayed .
|
FreshAL
Sir Crashalot

Joined: 04 Jul 2005
Karma : ")
|
|
| Back to top |
 |
You must be logged in to rate posts |
|
|
| Resident Yank |
This post is not being displayed .
|
Resident Yank
Renault 5 Driver
Joined: 17 May 2007
Karma :
|
Posted: 21:20 - 05 Nov 2009 ") Post subject: Post subject: |
|
|
Thanks for the comments. I'll add a little more to the story. While Richard had the bike back at his house finishing up the little bits of electrical stuff my job was to make the tank useable and bodywork look pretty.
We fitted the bodywork to the bike, having to cut and shave and force it to fit, not the best stuff and I would not recommend anyone use it.
Yay! It almost looks like a motorcycle!
https://i10.photobucket.com/albums/a144/Tiffanator/Phoenix/110-1087_IMG.jpg
We hit a slight snag when the windscreen that Richard bought for the bike wasn't even close to fitting. Now, the nice people at the fairing manufacturer told us that this windscreen was what fit this bodywork... not so. My job just got harder. The upper seemed way too wide for the screen. Apparently it was pulled from the mold too early and sagged.
Step by step process... First I cut the upper about 6-8 inches down from the middle of the windscreen.
https://i10.photobucket.com/albums/a144/Tiffanator/Phoenix/IMG_0003.jpg
Past the point of no return... I was nervous. Next I drilled the holes and fitted the windscreen in place. Then I marked how much needed to be trimmed to pull the "ears" together to match up with the windscreen. I held my breath and started trimming.
https://i10.photobucket.com/albums/a144/Tiffanator/Phoenix/IMG_0005.jpg
With a section cut out, it was time to put the windscreen on and make sure everything fit back on the bike.
https://i10.photobucket.com/albums/a144/Tiffanator/Phoenix/IMG_0006.jpg
https://i10.photobucket.com/albums/a144/Tiffanator/Phoenix/IMG_0007.jpg
Yes... it is a little bit crooked. That's because apparently the fairing itself is crooked, I haven't figured out what exactly is messed up with it, but something is.
Now that I knew everything would work out it was time to fix my cut. Out came the fiberglass. I used clear packing tape to hold the cut ends tight together, then laid up 2 layers of fiberglass on the inside of my cuts. Tucked it away in the house to cure overnight.
Sanded with 80 grit to remove any residue from the existing resin:
https://i10.photobucket.com/albums/a144/Tiffanator/Phoenix/IMG_0008.jpg
Front side taped up to catch any drippy resin and to hold it tight together:
https://i10.photobucket.com/albums/a144/Tiffanator/Phoenix/IMG_0009.jpg
2 Layers of fiberglass on the inside for strength:
https://i10.photobucket.com/albums/a144/Tiffanator/Phoenix/IMG_0010.jpg
After this had all cured I pulled off the tape and sanded down any excess resin on the outside. Then I mounted up the windscreen and filled the gaps with kitty hair. I covered the edges of the windscreen with clear tape to prevent the kitty hair from bonding to the plastic.
https://i10.photobucket.com/albums/a144/Tiffanator/Phoenix/IMG_0011.jpg
Don't have any pictures of what I did next, but once the kitty hair had cured I removed the windscreen, smoothed the edges and reinforced the back side of the kitty hair with a single layer of fiberglass. I allowed that to cure for a day and sanded out any drips. Then it was time for body filler. I smothered the area with body filler and let it cure.
This was coat 1 of 3:
https://i10.photobucket.com/albums/a144/Tiffanator/Phoenix/IMG_0021.jpg
Once I was satisfied with how the fairing had turned out it was time for a bath to remove oily residue then on to primer... finally.
Nice and smooth:
https://i10.photobucket.com/albums/a144/Tiffanator/Phoenix/IMG_0030.jpg
Don't have any pics of the primer, sealer, base 1, taping, base 2, and clear, only the finished product... so you have to wait.
I will tell you that painting the fairing was as much a nightmare as prepping it for paint. I learned that cheap vinyl WILL leave glue residue on the paint... and the only thing that will clean off the glue residue will also clean off the paint. Got all the way to being ready for clear and had to sand it back down with 180 grit and start completely over with primer, all because of some cheap vinyl I used to mask off a logo.
Will be back later with the fuel tank story. Nothing was easy with this bike....
____________________
Snooping in from the US, don't kill me. |
|
| Back to top |
| |
You must be logged in to rate posts |
|
|
| Zimbo |
This post is not being displayed .
|
Zimbo
World Chat Champion

Joined: 09 Jul 2004
Karma : ")
|
|
| Back to top |
| |
You must be logged in to rate posts |
|
|
| mr_s81 |
This post is not being displayed .
|
mr_s81
Nova Slayer
Joined: 24 Apr 2008
Karma :
|
| Posted: 00:15 - 06 Nov 2009 Post subject: |
|
|
Loving what you've done so far. Great detailed write up too! 
Keep it coming!  |
|
| Back to top |
| |
You must be logged in to rate posts |
|
|
| Kickstart |
This post is not being displayed .
|
Kickstart
The Oracle

Joined: 04 Feb 2002
Karma : ")
|
|
| Back to top |
| |
You must be logged in to rate posts |
|
|
| Wilson123 |
This post is not being displayed because the poster has bad karma. Unhide this post / all posts.
|
Wilson123
Nearly there...

Joined: 19 Jun 2009
Karma : ")
|
| Posted: 20:38 - 06 Nov 2009 Post subject: |
|
|
Fantastic thread and fantastic bike
I can't wait to see the final product 
____________________
Doug97 wrote: Fuck you, what they did was awesome. You just wish you had the balls to be like them, instead of being constantly afraid that there's a rule somewhere out there you might be breaking. |
|
| Back to top |
| |
You must be logged in to rate posts |
|
|
| SpicyBlimp |
This post is not being displayed .
|
SpicyBlimp
World Chat Champion
Joined: 15 Oct 2007
Karma : ")
|
| Posted: 09:02 - 08 Nov 2009 Post subject: |
|
|
Keep it up, Awesome job you've done so far, can't wait to see it finished 
Particularly like the fairing fix, alot of effort gone into that |
|
| Back to top |
| |
You must be logged in to rate posts |
|
|
| Resident Yank |
This post is not being displayed .
|
Resident Yank
Renault 5 Driver
Joined: 17 May 2007
Karma :
|
Posted: 18:02 - 09 Nov 2009 ") Post subject: Post subject: |
|
|
Thanks everyone. Kickstart, yes, once we figured out the resistor it did seem like a good idea to prevent hotwiring the bike. It did a fantastic job keeping us from starting it!
Now... this post will cover the dabacle that was the tank. From the very start I knew it would be the biggest challenge because of its condition.
Hole in the front:
https://i10.photobucket.com/albums/a144/Tiffanator/Phoenix/_MG_6386.jpg
Dents to one side, quite deep ones as well. Thankfully no majorly creased metal.
https://i10.photobucket.com/albums/a144/Tiffanator/Phoenix/_MG_6387.jpg
Another shot of the dent to get a sense of the depth.
https://i10.photobucket.com/albums/a144/Tiffanator/Phoenix/_MG_6388.jpg
And a dent on the other side.
https://i10.photobucket.com/albums/a144/Tiffanator/Phoenix/_MG_6391.jpg
The cracks that you see are only through the paint. After a different painter had a very bad experience with pulling a dent on my bike's tank, I knew a stud welder was out of the question. Simply touching the metal with a welder was an instant hole in the tank. I learned that the hard way. 
So Richard and I set out to pull the dent as best we could. Using silver solder and a MAP gas torch we brazed bolts onto the tank, then used the frame of a small, very cheap puller I had to slowly work the dents out. Starting from the outter edge and spiraling inward. Sorry... no pics of immediately after pulling, but we managed to get it about 75 percent out.
Once we had pulled the best we could it was time to address the hole. Richard brazed a patch over the hole, thankfully the tank was dented around so I could rebuild it and cover the patch. Once it was water tight, I sanded the paint off and shot it with a coat of epoxy primer to seal it up, prevent rust, and also give the kitty hair something to grab.
Still looking quite rough:
https://i10.photobucket.com/albums/a144/Tiffanator/Phoenix/IMG_0013.jpg
A nice thick coat of kitty hair:
https://i10.photobucket.com/albums/a144/Tiffanator/Phoenix/IMG_0017.jpg
https://i10.photobucket.com/albums/a144/Tiffanator/Phoenix/IMG_0018.jpg
https://i10.photobucket.com/albums/a144/Tiffanator/Phoenix/IMG_0020.jpg
Once the kitty hair had cured I sanded it with a block until I was happy with the overall curve of the tank. Its interesting having to completely rebuild the curve poriton of a tank, hard to avoid flat spots and I found myself constantly running my hand over the surface to pick out any flaws.
https://i10.photobucket.com/albums/a144/Tiffanator/Phoenix/IMG_0023.jpg
Once I was happy I layered on some body filler to smooth out any pinholes or low spots. Then sanded it down, put more on, and repeated until I was sure I had a smooth curve.
Washed and ready for 2 more coats of epoxy, 2 coats of primer, sealer, base and clear.
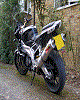
So... without further ado... I give you... the Phoenix:
https://i10.photobucket.com/albums/a144/Tiffanator/Phoenix/Final2s.jpg
No, the A sticker and blue tape is not part of the paint scheme. The last coat of clear went on the bike Wednesday night, Thursday night and Friday morning I mounted the fairings and modified a ZX-6R front fender to fit. Friday we loaded her in the trailer and Saturday morning she took her maiden track voyage. Obviously I've left out some stuff in my recount, like replacing the stock vacuum operated fuel pump with an electronic one.
https://i10.photobucket.com/albums/a144/Tiffanator/Phoenix/Final3s.jpg
Tribal style phoenix painted on the tail of the bike to symbolize it's journey from the ashes.
https://i10.photobucket.com/albums/a144/Tiffanator/Phoenix/Final8s.jpg
No decals on the bike. Its all paint. Perhaps not the most impressive ever, but its only my 3rd full bike to paint. I'm still working on it.
https://i10.photobucket.com/albums/a144/Tiffanator/Phoenix/Final6s.jpg
And a whore pic of yours truly. Got my first ever knee down on Saturday, and by Sunday afternoon I was consistently dragging a knee in several corners and dragging my right toe in 2 corners.
https://i10.photobucket.com/albums/a144/Tiffanator/Phoenix/TiffSV.jpg
Of course, there are still many things we want to do to the bike. Over winter I will have to modify the bellypan to put in a bulge where the exhaust is touching it and melting the paint off, I will also be making a fiberglass undertail and probably a new undertray to hold the computer unit but not be so in the way. I would also like to shave down the subframe and move the rear brake reservoir, the bump you see on the right side of the tail in some photos is the corner of the fluid reservior and has already buckled the paint in one spot. A rear hugger is on order, and a slipper clutch and either new rear shock or shims are planned to raise the ride height. I am dragging toe and not even getting to the edge of the rear tire. We are taking a break from it though until after the new year. Next trackday isn't until March.
So, I thank you all for reading, and I will update this thread when things get moving again.
____________________
Snooping in from the US, don't kill me. |
|
| Back to top |
| |
You must be logged in to rate posts |
|
|
| mr_s81 |
This post is not being displayed .
|
mr_s81
Nova Slayer
Joined: 24 Apr 2008
Karma :
|
| Posted: 18:14 - 09 Nov 2009 Post subject: |
|
|
Love it!!!
The finished bike looks lush. Really nice work!  |
|
| Back to top |
| |
You must be logged in to rate posts |
|
|
| Mystery |
This post is not being displayed .
|
Mystery
World Chat Champion

Joined: 23 Jul 2009
Karma : ")
|
| Posted: 00:18 - 11 Nov 2009 Post subject: |
|
|
looks nice good job
____________________
Carbon knuckles assure you maximum protect against debris and unfortunate accidents or if someone cuts you off, their side mirror.Mopeds are like chubby chicks.. they are really fun to ride until you're friends catch you on one |
|
| Back to top |
| |
You must be logged in to rate posts |
|
|
| Darth |
This post is not being displayed .
|
Darth
World Chat Champion

Joined: 15 Mar 2008
Karma : ")
|
| Posted: 16:16 - 11 Nov 2009 Post subject: |
|
|
Awesome work - both of you!
____________________
Harold_Shand wrote: I suppose it's like anything, you get your fingers burned when you start out, you learn from it and eventually become a complete arsehole about the whole thing. |
|
| Back to top |
| |
You must be logged in to rate posts |
|
|
| ben350 |
This post is not being displayed .
|
ben350
Trackday Trickster
Joined: 29 Apr 2008
Karma :
|
| Posted: 18:19 - 11 Nov 2009 Post subject: |
|
|
Looks good mate 
Kinda reminds me of a Trans-Am though 
____________________
Ducati 996 Biposto
Suzuki Goose 350
DT125R Supermoto (Project) |
|
| Back to top |
| |
You must be logged in to rate posts |
|
|
| DaveH |
This post is not being displayed .
|
DaveH
World Chat Champion
Joined: 03 Feb 2006
Karma : ")
|
|
| Back to top |
| |
You must be logged in to rate posts |
|
|
| Smooth |
This post is not being displayed .
|
Smooth
Could Be A Chat Bot

Joined: 21 Apr 2008
Karma :
|
|
| Back to top |
| |
You must be logged in to rate posts |
|
|
| Blackwolf |
This post is not being displayed .
|
Blackwolf
Burgerfist
Joined: 19 Nov 2006
Karma : ")
|
| Posted: 10:02 - 12 Nov 2009 Post subject: |
|
|
nice, you can see the amount of work thats gone into it!
Wonder whos going to bin it first?...
____________________
Current: Ducati Multistrada 1200s |
|
| Back to top |
| |
You must be logged in to rate posts |
|
|
| Deano |
This post is not being displayed .
|
Deano
World Chat Champion

Joined: 17 Feb 2003
Karma :
|
|
| Back to top |
| |
You must be logged in to rate posts |
|
|
| Resident Yank |
This post is not being displayed .
|
Resident Yank
Renault 5 Driver
Joined: 17 May 2007
Karma :
|
| Posted: 21:22 - 12 Nov 2009 Post subject: |
|
|
Thanks for the comments guys. I wasn't sure we would actually finish the bike, and we aren't totally done with it, but it has come a long way.
Ben... yes, a few people have made that comment about the Trans-Am, didn't really notice until someone said it. I am going to try to get a better looking phoenix on this winter, need some time with the airbrush.
Blackwolf... I hope its not me! At our trackweekend in September I lowsided Richard's CBR600 on Saturday, it went into the gravel where it flipped over and slid, so it rashed up both sides of the bike, then on Sunday I was riding it and it dropped a valve and ate up the engine so we are parting it out. Needless to say I was VERY nervous getting on this one the first time, especially since the motor had around 25 miles on it with the new pistons.. and I had roughly 2 miles in the saddle. Major butterflies. I was just waiting for the motor to blow, or the fairings fly off, or the swingarm break loose... something. I made Richard ride it during his session first, when it didn't blow up or crack in half I rode it.
____________________
Snooping in from the US, don't kill me. |
|
| Back to top |
| |
You must be logged in to rate posts |
|
 |
Old Thread Alert!
The last post was made 16 years, 232 days ago. Instead of replying here, would creating a new thread be more useful? |
 |
|
|


 rating
 rating