|
|
| Author |
Message |
| hmmmnz |
This post is not being displayed .
|

hmmmnz
Super Spammer

Joined: 22 Aug 2006
Karma : ") ")
|
 Posted: 14:21 - 19 Oct 2013 Posted: 14:21 - 19 Oct 2013 ") Post subject: bmw scrambler project (a slow build) Post subject: bmw scrambler project (a slow build) |
 |
|
ok, not long ago i bought an 1989 r80rt monolever beemer,
i was actually looking for an older r80/100 gs-pd or older g/s air cooled for a scrambler project
the reason was they had the wire wheels, and i detest the cast wheels on these old beemers,
but they were going for stupid money here in the uk, and then this old rt came up for about 1/3 my budget of what i was willing to pay for the gs model, so i thought fuck it, i can some how make it spoked,
i was going to change the front end of the gs any way, so that would only leave the rear wheel that would need some thinking about,
so anyway, collection, i had to drive down into england to pick up a bath room for the old merc camper, and this bike was kind of on the way, in so much as it was south of scotland 
met up with the guy, paid him the money and would return in the after noon to collect after getting the bath room,
all was good did that and rode back to edinburgh with no issues,
the rt models when they came out looked like this
https://www.bmbikes.co.uk/photos/photophotos/R80RT%20Mono%20644.JPG
whoa, super ugly fairing massive screens etc, perfect tourers, but one of the ugliest beemers ever
mine didnt come with the fairings (previously crashed) which suited me just fine
https://i58.photobucket.com/albums/g257/hmmmnz/bmw%20scrambler%20project/IMAG1050Medium_zps7f468747.jpg
https://i58.photobucket.com/albums/g257/hmmmnz/bmw%20scrambler%20project/IMAG1048Medium_zps3782fefe.jpg
also the guy changed the rocker covers from the flat newer style to the older skool ones
https://i58.photobucket.com/albums/g257/hmmmnz/bmw%20scrambler%20project/IMAG1054Medium_zps75159353.jpg
no really fussed either way,
i had already ditched the tail section and gave it to a mate, as ill be completly changing the back end
any way the plan,
1 change the rear wheel to a r100gs wheel, i bought that already and as we speak its being machined down to fit the monolever hub (there is no straight replacement wheel, but the gs wheel is close enough, and just requires 21.25mm (in my case) to be machined down inside the wheel itself)
https://www.stephenbottcher.net/BMW/misc/rearhubconv/2wheels.jpg
so no biggie
after that will be the front end or exhaust
ill be using a usd front end of un-known manufacture as a replacement to the stock beemer forks wheels, triples, etc, probably a drz or crf may be some white powers, price will determine that,
the exhaust will be a high level custom made running high from the start either 2-2 all the way through like a cl360
https://www.midamericaauctions.com/wp-content/uploads/2012/04/143A_1-1975-Honda-CL360.jpg
or 2-1 like this
https://cars-database.com/data_images/gallery/02/triumph-scrambler/triumph-scrambler-07.jpg
unsure yet
i will also raise /drop the swing arm and probably move the mount onto the steel part of the swing arm
https://i58.photobucket.com/albums/g257/hmmmnz/bmw%20scrambler%20project/IMAG1051Medium_zps60e2ab10.jpg
and possibly lengthen the swingarm to gain a bit of extra travel
im going to try and get it look a bit like this
https://www.boxerschmiede.de/fotos-projekte/bmw-scrambler-classic.jpg
but obviously a monolever, with exhaust on 1 side only, and usd forks
yeah, so, this will be a long-ish project, im a bit low on funds after bumming around europe in the campervan for the summer, and skiing all last winter, really should start looking for a job  
____________________
the humans are dead
I kick arse for the lord
Wiring Diagrams BIDNIP it bitches |
|
| Back to top |
  |
You must be logged in to rate posts |
|
 |
| stevo as b4 |
This post is not being displayed .
|
stevo as b4
World Chat Champion
Joined: 17 Jul 2003
Karma : ")
|
|
| Back to top |
 |
You must be logged in to rate posts |
|
|
| hmmmnz |
This post is not being displayed .
|
hmmmnz
Super Spammer
Joined: 22 Aug 2006
Karma :
|
Posted: 15:49 - 19 Oct 2013  Post subject: Post subject: |
|
|
i was going to put a bash plate on, but never thought about converting to dry sump,
i suppose the old oil in the frame might be quite cool, but doing oil changes was always a pain in the arse on my rotax engine'd mz500
i can see where your coming from though, ill tuck the idea in the back of my mind for future mulling
____________________
the humans are dead
I kick arse for the lord
Wiring Diagrams BIDNIP it bitches |
|
| Back to top |
| |
You must be logged in to rate posts |
|
|
| hmmmnz |
This post is not being displayed .
|
hmmmnz
Super Spammer
Joined: 22 Aug 2006
Karma :
|
Posted: 19:18 - 16 Apr 2014 ") Post subject: Post subject: |
|
|
right long time no reply,
well havn't done a huge amount,
rear wheel has been machined then un-machined, then left,
i'll get round to it at some stage,
i did the exhaust, im not entirely happy with it so will probably change it at some point to bring it closer to the frame, and have a more level run, but i am happy with the noise, its quiet at idle but makes an awesome noise at full whack,
any way pics:
https://i58.photobucket.com/albums/g257/hmmmnz/IMAG1298Medium_zps4403082a.jpg
https://i58.photobucket.com/albums/g257/hmmmnz/IMAG1299Medium_zpsc9c5c967.jpg
https://i58.photobucket.com/albums/g257/hmmmnz/IMAG1300Medium_zps016a9718.jpg
video
https://www.youtube.com/watch?v=l_RQzLAegDE
yeah, thats all for now, front end next
____________________
the humans are dead
I kick arse for the lord
Wiring Diagrams BIDNIP it bitches |
|
| Back to top |
| |
You must be logged in to rate posts |
|
|
| trevor saxe-coburg-gotha |
This post is not being displayed .
|
trevor saxe-coburg-gotha
World Chat Champion

Joined: 22 Nov 2012
Karma :
|
| Posted: 19:35 - 16 Apr 2014 Post subject: |
|
|
Sounding pretty damn mean. 
____________________
"Life is a sexually transmitted disease and the mortality rate is one hundred percent."
Mobylette Type 50 ---> Raleigh Grifter ---> Neval Minsk 125 |
|
| Back to top |
| |
You must be logged in to rate posts |
|
|
| BTTD |
This post is not being displayed .
|
BTTD
World Chat Champion
Joined: 22 Nov 2012
Karma :
|
|
| Back to top |
| |
You must be logged in to rate posts |
|
|
| hmmmnz |
This post is not being displayed .
|
hmmmnz
Super Spammer
Joined: 22 Aug 2006
Karma :
|
| Posted: 00:11 - 17 Apr 2014 Post subject: |
|
|
yeah as i said, im not particularly happy with the exhaust as yet,
i want it to run high like it does, but not to have the upwards angle,
it did look a bit better withe the exposed stainless pipes before i put the stainless guard on it, but it was too hot on my leg,
it'll get changed me thinks
____________________
the humans are dead
I kick arse for the lord
Wiring Diagrams BIDNIP it bitches |
|
| Back to top |
| |
You must be logged in to rate posts |
|
|
| hmmmnz |
This post is not being displayed .
|
hmmmnz
Super Spammer
Joined: 22 Aug 2006
Karma :
|
Posted: 17:31 - 18 Apr 2014 ") Post subject: Post subject: |
|
|
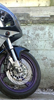
right front end done,
surprisingly easy,
im using an aprilia pegaso 650 complete front end,
and using the bmw master for the breaks, and the aprilia head race bearings,
funnily enough i had all the bearings to hand (i have a pegaso as well)
which was part of the reason i went for this usd set up,
all the mods i had to do was shorten the stem on the pegaso triples,
make a new set of head lamp brackets, and widen the headrace bearing cover over to fit the pegaso bearings, and make a new mount for the clocks,
by far and away the easiest usd conversion ive done,
any way pics
https://i58.photobucket.com/albums/g257/hmmmnz/IMAG1303Medium_zps88c4405f.jpg
https://i58.photobucket.com/albums/g257/hmmmnz/IMAG1304Medium_zpsb17a6481.jpg
https://i58.photobucket.com/albums/g257/hmmmnz/IMAG1305Medium_zps457f70d5.jpg
https://i58.photobucket.com/albums/g257/hmmmnz/IMAG1306Medium_zpse05cb272.jpg
my headlight brackets are just 2 exhaust clamps per side and a steel plate
https://i58.photobucket.com/albums/g257/hmmmnz/IMAG1307Medium_zps7c0dd0df.jpg
clocks, almost the same outlook
https://i58.photobucket.com/albums/g257/hmmmnz/IMAG1308Medium_zpsb11e9279.jpg
next is either seat and rear subframe or rear wheel
____________________
the humans are dead
I kick arse for the lord
Wiring Diagrams BIDNIP it bitches |
|
| Back to top |
| |
You must be logged in to rate posts |
|
|
| hmmmnz |
This post is not being displayed .
|
hmmmnz
Super Spammer
Joined: 22 Aug 2006
Karma :
|
| Posted: 23:34 - 25 Aug 2014 Post subject: |
|
|
update, for shits and giggles,
i have fitted a new subframe and seat,
https://i58.photobucket.com/albums/g257/hmmmnz/bmw%20scrambler%20project/IMG_20140704_215357Medium_zps1674e79d.jpg
https://i58.photobucket.com/albums/g257/hmmmnz/bmw%20scrambler%20project/IMG_20140704_215405Medium_zps1db63af6.jpg
umm since those pics, not that you can see it, the exhaust has been changed to run lower and closer to the engine and frame so it doesnt burn my fucken leg, and allows the boxes to be mounted as close as possible to the frame
excuse my niece and nephew.
i also rubbed off all the paint and am letting it rust a bit before chucking a clear over it, you know because all the kids are doing it,
so it must be cool, i thought about sticker bombing it, but came to the conclusion that im 35, not 17
https://i58.photobucket.com/albums/g257/hmmmnz/10592746_10152256609241606_7384337456128384276_n_zps2652d183.jpg
https://i58.photobucket.com/albums/g257/hmmmnz/10606207_571245656321181_7580090005276805392_n_zps50414730.jpg
https://i58.photobucket.com/albums/g257/hmmmnz/10628025_10152629222781224_8929361546526922805_n_zps9fa30a7d.jpg
the boxes are 20mm us army ammo boxes and come in at around 30 litres (29l) so are a fairly decent size without sticking out too far,
____________________
the humans are dead
I kick arse for the lord
Wiring Diagrams BIDNIP it bitches |
|
| Back to top |
| |
You must be logged in to rate posts |
|
|
| hmmmnz |
This post is not being displayed .
|
hmmmnz
Super Spammer
Joined: 22 Aug 2006
Karma :
|
| Posted: 16:37 - 26 Aug 2014 Post subject: |
|
|
|
|
| Back to top |
| |
You must be logged in to rate posts |
|
|
| Robby |
This post is not being displayed .
|
Robby
Dirty Old Man

Joined: 16 May 2002
Karma : ")
|
|
| Back to top |
| |
You must be logged in to rate posts |
|
|
| BenR |
This post is not being displayed .
|
BenR
World Chat Champion

Joined: 23 Jun 2008
Karma :
|
| Posted: 18:50 - 26 Aug 2014 Post subject: |
|
|
Looking good fella although not too sure on the rusty tank. Are you living in the UK now? I still owe you money dude.  |
|
| Back to top |
| |
You must be logged in to rate posts |
|
|
| Carl_steveo |
This post is not being displayed .
|
Carl_steveo
World Chat Champion

Joined: 23 Jun 2008
Karma :
|
| Posted: 20:54 - 26 Aug 2014 Post subject: |
|
|
I actually like the rusty tank. It's looking cool.
____________________
Current: Honda Nsr 125
Live: Sunderland
Luke "cant be arsed to read your post, but suck my balls anyway." |
|
| Back to top |
| |
You must be logged in to rate posts |
|
|
| hmmmnz |
This post is not being displayed .
|
hmmmnz
Super Spammer
Joined: 22 Aug 2006
Karma :
|
|
| Back to top |
| |
You must be logged in to rate posts |
|
|
| BigDan1190 |
This post is not being displayed .
|
BigDan1190
Could Be A Chat Bot

Joined: 03 Mar 2010
Karma : ") ")
|
|
| Back to top |
 |
You must be logged in to rate posts |
|
|
| PT1989 |
This post is not being displayed .
|
PT1989
Borekit Bruiser

Joined: 17 Apr 2014
Karma :
|
|
| Back to top |
| |
You must be logged in to rate posts |
|
|
| beardface |
This post is not being displayed .
|
beardface
Spanner Monkey
Joined: 19 Aug 2013
Karma : ")
|
| Posted: 23:00 - 02 Oct 2014 Post subject: |
|
|
|
|
| Back to top |
| |
You must be logged in to rate posts |
|
|
| hmmmnz |
This post is not being displayed .
|
hmmmnz
Super Spammer
Joined: 22 Aug 2006
Karma :
|
| Posted: 09:22 - 07 Oct 2014 Post subject: |
|
|
Id like to but since i have a usd front end its a bit harder to to than the conventional one that you posted,....
first i have a gearbox to rebuild,
Fucken thing shat itself at stormin the castle, and i had tobuy a new bike at the rally to take me on the euro trip,
bandit of course, just cant beat the reliability of the old oil cooled suzukis.
More as it happens
____________________
the humans are dead
I kick arse for the lord
Wiring Diagrams BIDNIP it bitches |
|
| Back to top |
| |
You must be logged in to rate posts |
|
|
| hmmmnz |
This post is not being displayed .
|
hmmmnz
Super Spammer
Joined: 22 Aug 2006
Karma :
|
| Posted: 20:02 - 14 Feb 2015 Post subject: |
|
|
ok, well as some of you know, on my way to do my euro trip i blew the gearbox coming into stormin the castle, so i ditched the beemer and bought a bandit12 to do it on,
fast foward to a few weeks ago when i finally got round to picking up thebmw and dropping it off to a local guy who is an expert on air head boxes, he has dozens of them and they get sent to him from around europe to do, luckily he agreed to do mine as he had nothing on,
and didnt even want to get paid for the job,
just pay for parts,
so here is his write up on the job
I had a quick look at the bike after you had gone. That box sounds as though its got a really serious problem, I've never heard a noise like that before. It will be interesting to see what happened (I'll post pictures).
I was out with horses today and tomorrow I've got to sort out a neighbour's chainsaw before doing anything else but hopefully I'll make a start at getting the box out.
I'll report back on progress.
....
Just to remind you, this is what turned up:
https://i227.photobucket.com/albums/dd167/Beemerbob/BMW%201987%20R80%20Rat%20Bike%20Gearbox%20Rebuild/DSCN3776_zps3yq6iwxz.jpg
https://i227.photobucket.com/albums/dd167/Beemerbob/BMW%201987%20R80%20Rat%20Bike%20Gearbox%20Rebuild/DSCN3779A_zpsvwzoxkmd.jpg
It was very difficult to push about as the box wasn't running free in Neutral, this was accompanied by horrible 'clunking' noises.
Pretty soon it was a sorry little Rat Bike :augie:
https://i227.photobucket.com/albums/dd167/Beemerbob/BMW%201987%20R80%20Rat%20Bike%20Gearbox%20Rebuild/DSCN3836_zps2qvgtldq.jpg
Taking it apart wasn't difficult. The tank was held on by the single fuel pipe and the airbox only had one bolt - which was very loose. The seat was clinging on with two nuts that were just started on their threads .
The air filter is a scrapper :blast.
Anyway, the box was soon on the bench:
https://i227.photobucket.com/albums/dd167/Beemerbob/BMW%201987%20R80%20Rat%20Bike%20Gearbox%20Rebuild/DSCN3797_zpsnpithxqo.jpg
The Output Flange nut came off OK, but the taper was very tight (a good sign).
https://i227.photobucket.com/albums/dd167/Beemerbob/BMW%201987%20R80%20Rat%20Bike%20Gearbox%20Rebuild/DSCN3812_zpspm4my0xv.jpg
https://i227.photobucket.com/albums/dd167/Beemerbob/BMW%201987%20R80%20Rat%20Bike%20Gearbox%20Rebuild/DSCN3815_zpsdc5slriu.jpg
The box was very dirty around the clutch end. The clutch lever was very stiff so I was expecting trouble there.
https://i227.photobucket.com/albums/dd167/Beemerbob/BMW%201987%20R80%20Rat%20Bike%20Gearbox%20Rebuild/DSCN3799_zpsetsakjj5.jpg
The magnetic drain plug didn't look too bad - which surprised me as I was expecting more swarf than this:
https://i227.photobucket.com/albums/dd167/Beemerbob/BMW%201987%20R80%20Rat%20Bike%20Gearbox%20Rebuild/DSCN3809_zpsqydusowf.jpg
Soon the box was apart to reveal . . Swarf everywhere  . .
https://i227.photobucket.com/albums/dd167/Beemerbob/BMW%201987%20R80%20Rat%20Bike%20Gearbox%20Rebuild/DSCN3827_zpsld8cl5xq.jpg
https://i227.photobucket.com/albums/dd167/Beemerbob/BMW%201987%20R80%20Rat%20Bike%20Gearbox%20Rebuild/DSCN3828_zpsn2osh3c3.jpg
https://i227.photobucket.com/albums/dd167/Beemerbob/BMW%201987%20R80%20Rat%20Bike%20Gearbox%20Rebuild/DSCN3829_zpsecivh7sn.jpg
https://i227.photobucket.com/albums/dd167/Beemerbob/BMW%201987%20R80%20Rat%20Bike%20Gearbox%20Rebuild/DSCN3831_zpskq42gcac.jpg
I can't show it in stills, but the rear bearing on the output shaft was the worst I've ever seen - its almost possible to remove the outer track from what's left of the balls and cage. The other bearings are shot as well - but are not as bad.
The output shaft has been pulled back from the front bearing. There shouldn't be any discernible space between the bearing and the fifth gear pinion. This is why we fit circlips to the front of the inner bearing :augie.
https://i227.photobucket.com/albums/dd167/Beemerbob/BMW%201987%20R80%20Rat%20Bike%20Gearbox%20Rebuild/DSCN3833_zpsvhuk6vlb.jpg
The swarf has contaminated the oil and has worn the two bearing sleeves that the first and second gear pinions run on - The plain sleeve for First Gear:
https://i227.photobucket.com/albums/dd167/Beemerbob/BMW%201987%20R80%20Rat%20Bike%20Gearbox%20Rebuild/DSCN3843_zpslef28hmv.jpg
The First Gear pinion has a plain thrust washer on each side. The inner one has been pressed into the Third Gear sliding pinion - its supposed to be flat . This has further damaged the bearing sleeve that did the damage to it.
https://i227.photobucket.com/albums/dd167/Beemerbob/BMW%201987%20R80%20Rat%20Bike%20Gearbox%20Rebuild/DSCN3842_zpsidndzctd.jpg
The (expensive) roller Bearing on the front of the Input Shaft is usually OK, however, this one is jammed solid and the rollers won't turn so I guess its full of swarf :blast.
https://i227.photobucket.com/albums/dd167/Beemerbob/BMW%201987%20R80%20Rat%20Bike%20Gearbox%20Rebuild/DSCN3853_zpsfinf9hh7.jpg
I think the box has run low on oil at some point in its life (there was oil in it when I drained it) as the Input and Output shafts have been 'blued' with heat where the bearings have been choked with swarf:
https://i227.photobucket.com/albums/dd167/Beemerbob/BMW%201987%20R80%20Rat%20Bike%20Gearbox%20Rebuild/DSCN3845_zpsq5nigjg0.jpg
https://i227.photobucket.com/albums/dd167/Beemerbob/BMW%201987%20R80%20Rat%20Bike%20Gearbox%20Rebuild/DSCN3848_zps3jgn6ymz.jpg
I'm not intending to replace them as the bearing sleeves will be renewed. I can't see them going soft (or brittle) with the heat treatment.
Some of the retaining washers and circlips on the Output Shaft are damaged and will be replaced. One circlip has been reduced to almost half its circumference, yet I didn't find any broken pieces :nenau.
https://i227.photobucket.com/albums/dd167/Beemerbob/BMW%201987%20R80%20Rat%20Bike%20Gearbox%20Rebuild/DSCN3839_zpsdg5ioq3x.jpg
The 'clunking' noise heard when the bike was being wheeled about came from the Drive shaft. The rear bearing on the Output Shaft was so worn that the Drive Flange was hitting the outer sleeve on the rear gearbox cover - where the 'boot' attaches. This movement allowed the Worm Drive on the Flange to chew-up the Speedometer Drive gear - you can see how the spline teeth are now tapered towards the lower end. I have ordered a 'Good used' one from Motorworks.
https://i227.photobucket.com/albums/dd167/Beemerbob/BMW%201987%20R80%20Rat%20Bike%20Gearbox%20Rebuild/DSCN3821_zpsfv03fvye.jpg
Worse, the Drive Flange has cracked the rear cover. Its not critical and I'll put a touch of Epoxy adhesive on it. A 'Good Used' rear cover is £110 from Motorworks .
https://i227.photobucket.com/albums/dd167/Beemerbob/BMW%201987%20R80%20Rat%20Bike%20Gearbox%20Rebuild/DSCN3901_zpsmafya6le.jpg
https://i227.photobucket.com/albums/dd167/Beemerbob/BMW%201987%20R80%20Rat%20Bike%20Gearbox%20Rebuild/DSCN3906_zpsaieufr8r.jpg
The good news:
There is some. The selector forks are fine with just one tip showing signs of heat. They will go back in OK.
https://i227.photobucket.com/albums/dd167/Beemerbob/BMW%201987%20R80%20Rat%20Bike%20Gearbox%20Rebuild/DSCN3858_zpsexcf478j.jpg
The complete Selector Mechanism is also A-OK. I'll replace the springs and Indexing Roller as a matter of course but this is actually better than some I've seen .
https://i227.photobucket.com/albums/dd167/Beemerbob/BMW%201987%20R80%20Rat%20Bike%20Gearbox%20Rebuild/DSCN3859_zpseepzgwja.jpg
https://i227.photobucket.com/albums/dd167/Beemerbob/BMW%201987%20R80%20Rat%20Bike%20Gearbox%20Rebuild/DSCN3863_zpstxiztope.jpg
The cam faces on the Input Shaft Shock Absorber are also very good.
https://i227.photobucket.com/albums/dd167/Beemerbob/BMW%201987%20R80%20Rat%20Bike%20Gearbox%20Rebuild/DSCN3856_zps9bkpgseb.jpg
The Clutch:
The Clutch assembly looked well past its sell-by date and I wasn't very hopeful about saving all of it.
https://i227.photobucket.com/albums/dd167/Beemerbob/BMW%201987%20R80%20Rat%20Bike%20Gearbox%20Rebuild/DSCN3804_zps6cdwtsqj.jpg
I removed the six 'hold down' bolts and expected the outer retaining ring to fall off and the Friction Plate to fall out . . . not a bit of it, the thing was welded together and nothing would shift it.
I soaked the three locating pegs in Penetrating Oil and left it for a couple of days - still no movement. So with a gas torch and a hammer and cold chisel (to use as a wedge) I eventually got the bits separated.
The Friction Plate is just down to the rivets and the rest is rusty and seized. I'll save what I can but I have ordered three new parts from Moto-Bins today.
https://i227.photobucket.com/albums/dd167/Beemerbob/BMW%201987%20R80%20Rat%20Bike%20Gearbox%20Rebuild/DSCN3892_zpsdlnv968m.jpg
https://i227.photobucket.com/albums/dd167/Beemerbob/BMW%201987%20R80%20Rat%20Bike%20Gearbox%20Rebuild/DSCN3893_zps9rk5i3vy.jpg
The problem then was that all the components were contaminated with very fine metal swarf and I didn't want to put anything back in that state. Washing the Gear Pinions in Kerosene didn't remove the swarf so I dug out my 27 litre Ultrasonic Cleaner :clap.
https://i227.photobucket.com/albums/dd167/Beemerbob/BMW%201987%20R80%20Rat%20Bike%20Gearbox%20Rebuild/DSCN3887_zps93ttfqbr.jpg
https://i227.photobucket.com/albums/dd167/Beemerbob/BMW%201987%20R80%20Rat%20Bike%20Gearbox%20Rebuild/DSCN3889_zpsoaqkqkme.jpg
"Hubble-Bubble" .
https://i227.photobucket.com/albums/dd167/Beemerbob/BMW%201987%20R80%20Rat%20Bike%20Gearbox%20Rebuild/DSCN3890_zpssicc6jwq.jpg
After two 20-minute sessions, the cleaning fluid was a dark brown colour.
https://i227.photobucket.com/albums/dd167/Beemerbob/BMW%201987%20R80%20Rat%20Bike%20Gearbox%20Rebuild/DSCN3896_zpskdphzm8r.jpg
When the fluid was drained the bottom was coated in particles - mostly steel swarf. I cleaned the tank out with a large clump of paper towel which came out covered in sparkly bits.
https://i227.photobucket.com/albums/dd167/Beemerbob/BMW%201987%20R80%20Rat%20Bike%20Gearbox%20Rebuild/DSCN3900_zpsd9vkfl6r.jpg
As the gear pinions and so on were now thoroughly de-greased I carefully re-oiled everything and set it aside ready for assembly.
I have a couple of (large) orders outstanding with Moto-Bins and Motorworks so assembly will have to wait until the shiny new bits have arrived.
To be continued....
.....
I fitted the centre track from a 6403 bearing onto the Output Shaft and then stuck it in the lathe.
Using a carbide strip ground down to a shade over 1mm thickness and given a cutting tip, I cut a circlip groove into the forward end.
https://i227.photobucket.com/albums/dd167/Beemerbob/BMW%201987%20R80%20Rat%20Bike%20Gearbox%20Rebuild/DSCN3915_zpszjraklez.jpg
It doesn't take long and a new circlip fitted OK.
https://i227.photobucket.com/albums/dd167/Beemerbob/BMW%201987%20R80%20Rat%20Bike%20Gearbox%20Rebuild/DSCN3919_zpsodrliax6.jpg
Then a van arrived . . Oooooh, shiny bits :bounce1.
https://i227.photobucket.com/albums/dd167/Beemerbob/BMW%201987%20R80%20Rat%20Bike%20Gearbox%20Rebuild/DSCN3909_zpspwe3ffml.jpg
Hmmmm, doesn't look like £432-worth does it :confused:.
https://i227.photobucket.com/albums/dd167/Beemerbob/BMW%201987%20R80%20Rat%20Bike%20Gearbox%20Rebuild/DSCN3911_zpslcgq1rlz.jpg
https://i227.photobucket.com/albums/dd167/Beemerbob/BMW%201987%20R80%20Rat%20Bike%20Gearbox%20Rebuild/DSCN3913_zps3ce3ztrg.jpg
It's not all for this bike as I'm re-stocking some of the small stuff .
New vs. Old.
https://i227.photobucket.com/albums/dd167/Beemerbob/BMW%201987%20R80%20Rat%20Bike%20Gearbox%20Rebuild/DSCN3920_zpsfco4ytcy.jpg
https://i227.photobucket.com/albums/dd167/Beemerbob/BMW%201987%20R80%20Rat%20Bike%20Gearbox%20Rebuild/DSCN3923_zpsjsb9cceu.jpg
The second gear bearing sleeve was a nice tight fit on the shaft.
https://i227.photobucket.com/albums/dd167/Beemerbob/BMW%201987%20R80%20Rat%20Bike%20Gearbox%20Rebuild/DSCN3925_zpsdpqw1vmj.jpg
Always ensure that these oil holes are lined up as there isn't an oil groove on the inside of the sleeve.
https://i227.photobucket.com/albums/dd167/Beemerbob/BMW%201987%20R80%20Rat%20Bike%20Gearbox%20Rebuild/DSCN3927_zpsvdc8vomz.jpg
The new 'High Fifth' gear was fitted, along with fourth & Second gears, front bearing and the all-important circlip. Second gear is a lovely fit on that new sleeve - smooth without any hint of play :thumb.
https://i227.photobucket.com/albums/dd167/Beemerbob/BMW%201987%20R80%20Rat%20Bike%20Gearbox%20Rebuild/DSCN3929_zps4yxl2tp4.jpg
https://i227.photobucket.com/albums/dd167/Beemerbob/BMW%201987%20R80%20Rat%20Bike%20Gearbox%20Rebuild/DSCN3932_zpscrfewuap.jpg
I then added the third and first gear pinions. First gear is also a nice smooth fit without shake on its new sleeve - quite unlike the way it was when it came off originally.
The 'Standard Fifth' gear is shown, there is no difference in diameter they just cunningly re-profile it to include fewer teeth :confused:.
https://i227.photobucket.com/albums/dd167/Beemerbob/BMW%201987%20R80%20Rat%20Bike%20Gearbox%20Rebuild/DSCN3935_zpswxpcu0zo.jpg
I built up the Input and Intermediate shafts yesterday, but didn't take pictures (it involves spring compressors, various home-made steel 'dollies' and my floor press) all three shafts are now ready to go back in. The Gear Selector mechanism is also ready with new springs and Indexing Roller.
https://i227.photobucket.com/albums/dd167/Beemerbob/BMW%201987%20R80%20Rat%20Bike%20Gearbox%20Rebuild/DSCN3937_zpsf2p61wxq.jpg
I may get the box assembled tomorrow but then there will be a short break as I'm off to "The Bristol Classic Bike Show" at Shepton Mallet on Friday/Saturday. I won't be on the 1150GSA this year as I don't fancy the M6 on a Friday with snow and ice - I'll be taking a large 4x4  . I must be getting old and soft :rob. . I must be getting old and soft :rob.
I put the gearbox casing through the Ultrasonic Cleaner yesterday. It is clean but the alloy is now dark and mottled. I'll see if I can clean it up with something before building it up.
To be continued . . . .
.....
More progress to report :thumb.
Having assembled the three shafts I heated the gearbox case with a Propane torch and fitted them along with the intermediate shaft selector fork that has to go in at the same time. There are two oil baffles in front of the Intermediate & Output shafts and the Input shaft's roller bearing has to go in before the others as all three bearings are an Interference fit. It entails a bit of juggling and one has to be quick.
A quick tap with a rubber mallet ensures that all bearings are seated before the case cools.
Then the Selector mechanism, Output Shaft Selector forks and shaft and main oil baffle are fitted.
https://i227.photobucket.com/albums/dd167/Beemerbob/BMW%201987%20R80%20Rat%20Bike%20Gearbox%20Rebuild/DSCN3938_zpsbz68ljtd.jpg
When the case has cooled the gear lever if fitted and the gearchange is checked. It isn't great with the rear bearings unsupported but as long as all gears can be selected it will be OK when the rear cover is fitted.
Then the rear cover gasket goes on with a light smear of Blue Hylomar.
https://i227.photobucket.com/albums/dd167/Beemerbob/BMW%201987%20R80%20Rat%20Bike%20Gearbox%20Rebuild/DSCN3944_zpspf0iigkm.jpg
https://i227.photobucket.com/albums/dd167/Beemerbob/BMW%201987%20R80%20Rat%20Bike%20Gearbox%20Rebuild/DSCN3945_zps4gnwjvul.jpg
And now for the technical bit - Shimming the end-float .
One needs a 'Shimming Plate' for this job:
https://i227.photobucket.com/albums/dd167/Beemerbob/BMW%201987%20R80%20Rat%20Bike%20Gearbox%20Rebuild/DSCN3947_zps9v7hg4kc.jpg
I have drilled mine so that I can bolt it down on top of the gasket. I think that this gives me the most accurate measurements but people have different approaches and may just rest the plate on the case or put the gasket in after the measuring has been done - each to his own.
https://i227.photobucket.com/albums/dd167/Beemerbob/BMW%201987%20R80%20Rat%20Bike%20Gearbox%20Rebuild/DSCN3949_zps1g4crc6g.jpg
I use a 'Outside Micrometer' and a 'Depth Micrometer' for this job.
First measure the thickness of the Shimming Plate:
https://i227.photobucket.com/albums/dd167/Beemerbob/BMW%201987%20R80%20Rat%20Bike%20Gearbox%20Rebuild/DSCN3953_zpsdz7vynuy.jpg
Then measure the thickness of the oil baffle that goes on the rear of the Intermediate shaft:
https://i227.photobucket.com/albums/dd167/Beemerbob/BMW%201987%20R80%20Rat%20Bike%20Gearbox%20Rebuild/DSCN3954_zps5h0mzujz.jpg
Using the Depth Micrometer, measure the height of each bearing above the plate - I take about six measurements around each bearing.
https://i227.photobucket.com/albums/dd167/Beemerbob/BMW%201987%20R80%20Rat%20Bike%20Gearbox%20Rebuild/DSCN3955_zpsshxkwjbj.jpg
Then measure the depth of the bearing housings in the rear cover - again, I take about six per bearing.
https://i227.photobucket.com/albums/dd167/Beemerbob/BMW%201987%20R80%20Rat%20Bike%20Gearbox%20Rebuild/DSCN3956_zpsny5tjjka.jpg
All of this is written down and then the shim thickness is calculated for each bearing:
The formula goes . .
(Depth in cover - 0.05mm clearance) - (height above plate + plate thickness + baffle thickness) = Shim thickness.
One then has to assemble a collection of shims to the right value. These come in four nominal sizes - 0.20mm / 0.28mm / 0.38mm / 0.50mm. However there is quite a variation and I spend time mixing & matching until I get the right result to within 0.02mm.
Here, I am looking for 0.95mm for the Output shaft and the shims measure 0.94 - good enough for me .
https://i227.photobucket.com/albums/dd167/Beemerbob/BMW%201987%20R80%20Rat%20Bike%20Gearbox%20Rebuild/DSCN3959_zps6jjno24g.jpg
The collection of shims are lightly greased and placed centrally on the bearings - you don't want them moving as the cover is fitted :blast.
https://i227.photobucket.com/albums/dd167/Beemerbob/BMW%201987%20R80%20Rat%20Bike%20Gearbox%20Rebuild/DSCN3961_zpsh1wby3ef.jpg
I screw four 6mm studs into the back if the case as a guide for the cover. It will be hot and if fumbled causes mayhem with shims falling about the place .
https://i227.photobucket.com/albums/dd167/Beemerbob/BMW%201987%20R80%20Rat%20Bike%20Gearbox%20Rebuild/DSCN3965_zpsyoogcte0.jpg
A final check is made of the rear cover to ensure it is flat. If not it will cause problems.
https://i227.photobucket.com/albums/dd167/Beemerbob/BMW%201987%20R80%20Rat%20Bike%20Gearbox%20Rebuild/DSCN3963_zpswps0ktwu.jpg
And then the cover is heated with the Propane torch and carefully lowered onto the bearings. It is then tapped down with a rubber mallet and five of the nine set screws are fitted.
https://i227.photobucket.com/albums/dd167/Beemerbob/BMW%201987%20R80%20Rat%20Bike%20Gearbox%20Rebuild/DSCN3967_zpswqcbycb3.jpg
The studs are removed and all set screws fitted and torqued-down to 9 lbs/ft.
https://i227.photobucket.com/albums/dd167/Beemerbob/BMW%201987%20R80%20Rat%20Bike%20Gearbox%20Rebuild/DSCN3969_zpsqtaqeoqm.jpg
When the box has cooled and I am happy that the clearances feel right I fit the three oil seals. First the input shaft splines are masked and the shaft given a light smear of grease.
https://i227.photobucket.com/albums/dd167/Beemerbob/BMW%201987%20R80%20Rat%20Bike%20Gearbox%20Rebuild/DSCN3970_zps9p75prcr.jpg
I use a long socket of appropriate size to seat the oil seal into the case. The seal is given a light coat of Blue Hylomar to ensure its oil tight around the case.
https://i227.photobucket.com/albums/dd167/Beemerbob/BMW%201987%20R80%20Rat%20Bike%20Gearbox%20Rebuild/DSCN3972_zpskbkyyqfn.jpg
Surplus compound is wiped away and that's one done :thumb.
https://i227.photobucket.com/albums/dd167/Beemerbob/BMW%201987%20R80%20Rat%20Bike%20Gearbox%20Rebuild/DSCN3973_zpsetqay0zg.jpg
Now remove the gear lever and repeat the process with the gear lever shaft oil seal. I used an 18mm socket to seat it.
https://i227.photobucket.com/albums/dd167/Beemerbob/BMW%201987%20R80%20Rat%20Bike%20Gearbox%20Rebuild/DSCN3974_zpsqtqrlqak.jpg
https://i227.photobucket.com/albums/dd167/Beemerbob/BMW%201987%20R80%20Rat%20Bike%20Gearbox%20Rebuild/DSCN3975_zpsf32hunxq.jpg
The gear lever shaft is given a light smear of grease and replaced.
https://i227.photobucket.com/albums/dd167/Beemerbob/BMW%201987%20R80%20Rat%20Bike%20Gearbox%20Rebuild/DSCN3976_zpsfxgigtlw.jpg
The Output Shaft oil seal is given the same treatment. This is a Monolever bike so the oil seal lips face outwards to let the box breath into the leg (which has oil in it). Paralevers have a different oil seal that is faced inwards as the leg is dry. Paralever boxes breath through the hollow bolt that secures the speedometer cable and battery earth strap.
I use a flat steel disk I turned on the lathe with a 50mm 3/4" drive socket to seat the rear oil seal.
https://i227.photobucket.com/albums/dd167/Beemerbob/BMW%201987%20R80%20Rat%20Bike%20Gearbox%20Rebuild/DSCN3977_zpsofgkyfyz.jpg
The output Shaft drive flange is then given a light greasing and fitted to the taper shaft - the taper is kept dry. The nut is torqued down to 161 lbs/ft which is a bit of a heave. I use a long locking bar and a Certified 50-300 lbs/ft 3/4"-drive torque wrench for this.
https://i227.photobucket.com/albums/dd167/Beemerbob/BMW%201987%20R80%20Rat%20Bike%20Gearbox%20Rebuild/DSCN3978_zpszogg75kh.jpg
Almost finished now. The Neutral Switch is checked with a Multi-Meter and fitted with a new washer. The Drain Plug is also fitted with a new washer. I cleaned the swarf off the magnet with cloth and a high-pressure air line (don't try this at home kids :rob).
https://i227.photobucket.com/albums/dd167/Beemerbob/BMW%201987%20R80%20Rat%20Bike%20Gearbox%20Rebuild/DSCN3980_zpsquf31bmh.jpg
The replacement Speedometer Drive, a new collar and the breather bolt are then fitted (it doesn't strictly need a breather bolt as a plain one would do but it has one so it went back in).
https://i227.photobucket.com/albums/dd167/Beemerbob/BMW%201987%20R80%20Rat%20Bike%20Gearbox%20Rebuild/DSCN3982_zpsxen1lxoa.jpg
And that's it - the box is finished . . . .
https://i227.photobucket.com/albums/dd167/Beemerbob/BMW%201987%20R80%20Rat%20Bike%20Gearbox%20Rebuild/DSCN3984_zpsjtzbbxkd.jpg
Now for the clutch . . . . .
......
so thats it, box is done clutch done, bike back together
and a massive parts bill to pay, almost to the price i paid for the bike a couple of years agio
____________________
the humans are dead
I kick arse for the lord
Wiring Diagrams BIDNIP it bitches |
|
| Back to top |
| |
You must be logged in to rate posts |
|
|
| Just_James |
This post is not being displayed .
|
Just_James
Could Be A Chat Bot

Joined: 29 Aug 2014
Karma :
|
| Posted: 21:42 - 14 Feb 2015 Post subject: |
|
|
Nice work on this
That's an awesome ultrasonic cleaner too! Would love one of those!
____________________
Current Bikes / Projects: 1999 Rieju RS1 50
Previous bikes - 1986 DT125R (field bike), 1989 KX250, 1980 KX420 (with 500cc big bore), 1992 YZ250, 1988 KX500, 1989 XR250R, 1988 VFR400R NC24, 1999 Cagiva Mito 125, 2008 Rieju RS2 50 , 1993 Honda NSR 125 |
|
| Back to top |
| |
You must be logged in to rate posts |
|
|
| hmmmnz |
This post is not being displayed .
|
hmmmnz
Super Spammer
Joined: 22 Aug 2006
Karma :
|
| Posted: 01:00 - 19 Feb 2015 Post subject: |
|
|
Well, where was I . . Oh yes - the clutch.
All the new parts (plus one old one) were laid out:
https://i227.photobucket.com/albums/dd167/Beemerbob/BMW%201987%20R80%20Rat%20Bike%20Gearbox%20Rebuild/DSCN3988_zpshrwkrpxo.jpg
I then de-greased and washed the flywheel and housing as well as I could with Industrial cleaner and hot water (DOH, I should have set the camera 'white balance' to "Daylight" :blast).
https://i227.photobucket.com/albums/dd167/Beemerbob/BMW%201987%20R80%20Rat%20Bike%20Gearbox%20Rebuild/DSCN3989_zpsikdjzwz5.jpg
I used 'Optimol TA' on the splines and spring contact points before assembly to make sure that everything moves smoothly.
Its just like a car clutch and the friction plate needs to be centred before the cover plate is tightened down. I used a spare Input Shaft with the pushrod pushed through to the diaphragm spring to align everything before the 6 set screws are tightened down evenly to a final torque of 17 lbs/ft.
https://i227.photobucket.com/albums/dd167/Beemerbob/BMW%201987%20R80%20Rat%20Bike%20Gearbox%20Rebuild/DSCN3991_zpskerh7z9x.jpg
The Input shaft is then withdrawn and the gearbox installed. I had removed the swing arm to make this easier.
https://i227.photobucket.com/albums/dd167/Beemerbob/BMW%201987%20R80%20Rat%20Bike%20Gearbox%20Rebuild/DSCN3993_zpsmrwjjoqs.jpg
With the gearbox installed (the splines lined-up OK, thankfully) The airbox goes on - this is not a nice job as the two upper bolts are a fiddle. I should have ground a 6mm Allen Key down a bit but decided to just take my time over it.
https://i227.photobucket.com/albums/dd167/Beemerbob/BMW%201987%20R80%20Rat%20Bike%20Gearbox%20Rebuild/DSCN3994_zpsy4xjhenk.jpg
Notice anything missing . . . Yup, I forgot to put the cross-over fuel pipe in so it all had to come apart . . Bummer :blast.
The clutch operating arm is then installed and set to the requisite 203mm clearance from the cable mounting lug (The BMW Club had long articles in their mag about this :augie ).
https://i227.photobucket.com/albums/dd167/Beemerbob/BMW%201987%20R80%20Rat%20Bike%20Gearbox%20Rebuild/DSCN3995_zpskcgle67p.jpg
I thought I'd better put a new Air Filter in while I was at it :rolleyes:.
https://i227.photobucket.com/albums/dd167/Beemerbob/BMW%201987%20R80%20Rat%20Bike%20Gearbox%20Rebuild/DSCN4000_zpsacalymqq.jpg
The rear brake stoplight switch looked a bit past its best - but it works :thumb.
https://i227.photobucket.com/albums/dd167/Beemerbob/BMW%201987%20R80%20Rat%20Bike%20Gearbox%20Rebuild/DSCN4004_zpsv9k3vc2r.jpg
The swing Arm was installed, centred and torqued-down. A new Speedo Cable boot was fitted in place of the hard and cracked one and everything started coming together.
I remembered to fill the gearbox with oil and while I was at it checked and topped up the bevel drive and drive shaft. The engine oil was nice and clean so didn't need touching.
https://i227.photobucket.com/albums/dd167/Beemerbob/BMW%201987%20R80%20Rat%20Bike%20Gearbox%20Rebuild/DSCN4006_zpsabpwowjj.jpg
Then the rear carrier, tank, seat and silencer (:confused:) were fitted. This involved bad language and a lack of photographs but finally here we are . . . .
The Rat Bike Lives :bounce1 :clap.
https://i227.photobucket.com/albums/dd167/Beemerbob/BMW%201987%20R80%20Rat%20Bike%20Gearbox%20Rebuild/DSCN4026_zpsfl4ypeiv.jpg
https://i227.photobucket.com/albums/dd167/Beemerbob/BMW%201987%20R80%20Rat%20Bike%20Gearbox%20Rebuild/DSCN4029_zpsr3e9gh9o.jpg
https://i227.photobucket.com/albums/dd167/Beemerbob/BMW%201987%20R80%20Rat%20Bike%20Gearbox%20Rebuild/DSCN4033_zpsemt0rmtp.jpg
https://i227.photobucket.com/albums/dd167/Beemerbob/BMW%201987%20R80%20Rat%20Bike%20Gearbox%20Rebuild/DSCN4035_zpsgswv40p0.jpg
https://i227.photobucket.com/albums/dd167/Beemerbob/BMW%201987%20R80%20Rat%20Bike%20Gearbox%20Rebuild/DSCN4034_zps5wt6xsnu.jpg
https://i227.photobucket.com/albums/dd167/Beemerbob/BMW%201987%20R80%20Rat%20Bike%20Gearbox%20Rebuild/DSCN4036_zpskmkgmypb.jpg
so thats it, got the bike back today,
ride home was interesting, would only fire on one except at idle or with the choke on, so i rode home on the choke still managed 65mph with the new higher 5th gear just on choke
clutch is super easy, easier than any of my other bikes in fact,
to do jobs are, unblock main jet, replace all the cables,
balance the carbs, do the valve clearances, tighten the rocker arm end play, replace the indicator relay with a led unit, then start the rear wheel spoked wheel
____________________
the humans are dead
I kick arse for the lord
Wiring Diagrams BIDNIP it bitches |
|
| Back to top |
| |
You must be logged in to rate posts |
|
|
| MarJay |
This post is not being displayed .
|
MarJay
But it's British!

Joined: 15 Sep 2003
Karma :
|
|
| Back to top |
| |
You must be logged in to rate posts |
|
|
| Pete. |
This post is not being displayed .
|
Pete.
Super Spammer

Joined: 22 Aug 2006
Karma : ")
|
| Posted: 10:25 - 19 Feb 2015 Post subject: |
|
|
Good write-up on the guy's rebuild job. I'm surprised that the cluster end-float clearance is just 2 thou. Seems unnecessarily tight to me but if the guy does so many I guess he must know what he's doing.
____________________
a.k.a 'Geri'
132.9mph off and walked away. Gear is good, gear is good, gear is very very good |
|
| Back to top |
| |
You must be logged in to rate posts |
|
|
| chris-red |
This post is not being displayed .
|
chris-red
Have you considered a TDM?

Joined: 21 Sep 2005
Karma : ")
|
|
| Back to top |
| |
You must be logged in to rate posts |
|
|
| Moxey |
This post is not being displayed .
|
Moxey
World Chat Champion

Joined: 11 May 2011
Karma :
|
| Posted: 13:53 - 19 Feb 2015 Post subject: |
|
|
Ah so yours was the exploding Beemer from Stormin  a friend was nearby when that happened recall him telling me about it on the night, would never have guessed it was someone from on here. a friend was nearby when that happened recall him telling me about it on the night, would never have guessed it was someone from on here.
As for the bike I think it would look a little better if the tank was painted either black or possibly this colour scheme
https://t1.gstatic.com/images?q=tbn:ANd9GcQhvkrQsk9dFYwCJ-u7-EtkXj_TUkd50Z21F-2-1VSVRCGbcrewVg
____________________
Current: 55 FZS 1000S, 02 FZS 1000, 77 CG 125, 04 XR 125 Some Bike Pics...
'I was too busy paying attention to pay attention' |
|
| Back to top |
| |
You must be logged in to rate posts |
|
 |
Old Thread Alert!
The last post was made 9 years, 58 days ago. Instead of replying here, would creating a new thread be more useful? |
 |
|
|


 rating
 rating