|
|
| Author |
Message |
| Damon |
This post is not being displayed .
|

Damon
World Chat Champion

Joined: 24 Aug 2007
Karma : ")
|
 Posted: 15:45 - 04 May 2008 Posted: 15:45 - 04 May 2008 ") Post subject: New Tail unit... Post subject: New Tail unit... |
 |
|
I don't know if this is in the right section or not so feel free to move to "show and tell" if needs be.
Well, it all started when I fitted my new alarm into the tail unit of my bike. I found replacing my rear seat was hindered by the new alarm unit rivited to the subframe of the RS. My rear seat was scratched anyway from the previous owners launching it into a hedge, so, I decided to make a new rear seat cowl that could replace the dodgy looking, dodgy fitting rear seat. I know I can buy tail units off ebay but I wanted something that I could just attach to my existing tail unit. Meaning I can quickly chuck the old seat back on if needs be.
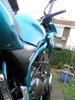
So first off, I went and removed the rear seat from the bike and got some fibreglassing gear ready from Halfrauds. I started by covering the seat in a layer of resin and then applying some precut fibreglass matting strips ontop to form a copy of the seat dimentions (well a mm or 2 bigger).
https://img180.imageshack.us/img180/7664/19607700zd7.jpg
https://img240.imageshack.us/img240/6679/47285045ng9.jpg
As I wanted a sort of fin ontop of the seat to prevent people sitting I went about making a fin using a cardboard model as a guide. I layed the fibreglass over the model using the exact same method as before. Once that was dry I took some industrial scissors and cut off any rough edges. I then took the sanding block to it, making sure everything was straight and even. When prying the cured fibreglass mould from the carboard i managed to get a small layer of card on the inside that wouldn't budge. Luckily it will not be seen, so I plow on.
https://img233.imageshack.us/img233/2941/48395825up6.jpg
Next step was to attach this fin onto the main unit, tidy up the edges and general shaping. Again using fibreglass matting I eyed up the fin on the unit and began attaching it using a higher concentration of hardener to resin (as I didnt want to wait for it to dry). Once this was dry I started on the edges. Again, I used cardboard on the inside of the main unit to give the fibreglass strips something to sit on whilst drying. These were removed while the FG was almost cured but still slightly tacky, thus reducing the chance of the cardboard bonding perminately to tail unit. Once the strips around the edge of the unit were completely dried, I took the scissors to them to create an even edge, and an obital sander to ensure everything was as required.
https://img353.imageshack.us/img353/7369/16714097lg9.jpg
https://img229.imageshack.us/img229/3460/15247165yv7.jpg
I follwed this by shaping the fin so that it wouldn't poke me in the back if I leant back. My hacksaw was in my garage so I had to make do with a breadknife. It worked a treat and make the fin seem slightly smaller (which I wanted). You may have noticed I have now finished fibreglassing around the edge of the unit and shaping it correctly. I also sprayed it with grey primer for added cool effect. I will be using the primer for sanding as I find it helps to get an even surface.
https://img359.imageshack.us/img359/3149/92245841uk0.jpg
Then it was time for test fitting... and low and behold it was slightly too long  So using the accurate measurment of my fingers I cut down the length of the seat unit by around about 1/4 inch. And welded it back together using fibreglass tissue (thought I would try that instead(its much better to work with)). Test fitted again and it was perfect So using the accurate measurment of my fingers I cut down the length of the seat unit by around about 1/4 inch. And welded it back together using fibreglass tissue (thought I would try that instead(its much better to work with)). Test fitted again and it was perfect  Next I mixed up some car body filler and fibreglass resin to the radio of around 5:2 and painted it into the unit. The resin waters down the bodyfiller and gives it a harder surface whilst still being relatively easy to sand. Next I mixed up some car body filler and fibreglass resin to the radio of around 5:2 and painted it into the unit. The resin waters down the bodyfiller and gives it a harder surface whilst still being relatively easy to sand.
https://img527.imageshack.us/img527/4838/53314569cy5.jpg
And there we are, As I am writing this, it is sitting outside basking in the great english weather. I will update as I make more progress in the next few days. 
Last edited by Damon on 16:21 - 04 May 2008; edited 4 times in total |
|
| Back to top |
   |
You must be logged in to rate posts |
|
 |
| MaybeGuy |
This post is not being displayed .
|
MaybeGuy
Super Spammer

Joined: 12 Mar 2007
Karma : ") ")
|
Posted: 16:02 - 04 May 2008  Post subject: Post subject: |
|
|
looks like a chunk of frozen fish
____________________
Blue_SV650S wrote: it was a sh1te wheelie, but it proves that he can get it up in 3rd and can do angles. In summery, mattsprattuk is a gobby little sh1tebag, dopehead tw4t, but sadly for all of us, he probably isn't THAT full of sh1te!!
Kickstart wrote: Hi I tend to agree with Matt. All the best Keith
|
|
| Back to top |
| |
You must be logged in to rate posts |
|
|
| Thom |
This post is not being displayed .
|
Thom
World Chat Champion
Joined: 24 Oct 2007
Karma : ")
|
|
| Back to top |
| |
You must be logged in to rate posts |
|
|
| MaybeGuy |
This post is not being displayed .
|
MaybeGuy
Super Spammer
Joined: 12 Mar 2007
Karma :
|
| Posted: 19:10 - 04 May 2008 Post subject: |
|
|
what are you going to do with that gaping hole?
____________________
Blue_SV650S wrote: it was a sh1te wheelie, but it proves that he can get it up in 3rd and can do angles. In summery, mattsprattuk is a gobby little sh1tebag, dopehead tw4t, but sadly for all of us, he probably isn't THAT full of sh1te!!
Kickstart wrote: Hi I tend to agree with Matt. All the best Keith
|
|
| Back to top |
| |
You must be logged in to rate posts |
|
|
| Damon |
This post is not being displayed .
|
Damon
World Chat Champion
Joined: 24 Aug 2007
Karma :
|
| Posted: 20:33 - 04 May 2008 Post subject: |
|
|
The hole will be filled (I filled it tonight). I done this by cutting out the triangle shape in fibreglass tissue and then placing it on a piece of laminated card. Once this was dried, I peeled it off and fitted it over the hole and held that in place with resin. I then continued to use the mixture of bodyfiller / resin to cover the rest of the unit with a thin film. As I was using cheap brushes, I managed to lose about 20% of the bristles in with the bodyfiller. Cue using tweesers to pick them out one by one. Thats why it looks a bit messy in the picture.
Since this picture was taken I've started sanding down. Will do more in the morning. Its about day 5 of the project now.
https://img378.imageshack.us/img378/7410/48835975zg4.jpg
EDIT: here is a picture of it after a first quick sand. I will resand/fill tomorrow and continue to do so until everything is smooth and there are no ridges.
https://img210.imageshack.us/img210/3513/32489613pq6.jpg |
|
| Back to top |
| |
You must be logged in to rate posts |
|
|
| Thom |
This post is not being displayed .
|
Thom
World Chat Champion
Joined: 24 Oct 2007
Karma :
|
|
| Back to top |
| |
You must be logged in to rate posts |
|
|
| Damon |
This post is not being displayed .
|
Damon
World Chat Champion
Joined: 24 Aug 2007
Karma :
|
| Posted: 10:12 - 05 May 2008 Post subject: |
|
|
Its a bit too late now as I would ruin it by taking the fin off. Let me know what you think when its finished as I agree it looks a bit naff at the moment.
Keep the comments coming
 |
|
| Back to top |
| |
You must be logged in to rate posts |
|
|
| TUG |
This post is not being displayed .
|
TUG
World Chat Champion
Joined: 12 May 2007
Karma : ")
|
|
| Back to top |
| |
You must be logged in to rate posts |
|
|
| Faraz |
This post is not being displayed .
|
Faraz
Nearly there...

Joined: 26 May 2007
Karma : ")
|
|
| Back to top |
| |
You must be logged in to rate posts |
|
|
| Faraz |
This post is not being displayed .
|
Faraz
Nearly there...
Joined: 26 May 2007
Karma :
|
|
| Back to top |
| |
You must be logged in to rate posts |
|
|
| Damon |
This post is not being displayed .
|
Damon
World Chat Champion
Joined: 24 Aug 2007
Karma :
|
|
| Back to top |
| |
You must be logged in to rate posts |
|
|
| Damon |
This post is not being displayed .
|
Damon
World Chat Champion
Joined: 24 Aug 2007
Karma :
|
| Posted: 21:08 - 05 May 2008 Post subject: |
|
|
UPDATE
Today I spent my evening making friends with 60 grit sandpaper. I spent what seemed like forever sanding and filling to get a totally smooth surface. When I was happy and slightly bored I gave it a quick rub over with 600grit wet and dry to remove the marks the 60 left. I then gave it a coat with primer to see where I would have to sand again tomorrow. This is what it looks like so far...
https://img232.imageshack.us/img232/2286/10tp5.jpg
https://img213.imageshack.us/img213/6029/11ck3.jpg
https://img228.imageshack.us/img228/7800/12qm5.jpg
Tomorrow I will finish off sanding to get everything completely smooth. A couple of spots wern't perfect. I will then give it a couple of coats of primer and start working on a method to keep it on the bike. |
|
| Back to top |
| |
You must be logged in to rate posts |
|
|
| tutton |
This post is not being displayed .
|
tutton
World Chat Champion

Joined: 04 Jan 2008
Karma :
|
|
| Back to top |
| |
You must be logged in to rate posts |
|
|
| hmmmnz |
This post is not being displayed .
|
hmmmnz
Super Spammer

Joined: 22 Aug 2006
Karma : ")
|
|
| Back to top |
| |
You must be logged in to rate posts |
|
 |
Old Thread Alert!
The last post was made 17 years, 275 days ago. Instead of replying here, would creating a new thread be more useful? |
 |
|
|


 rating
 rating